
Email inboxes contain a treasure trove of valuable information and email addresses are among the most critical identifiers in the corporate world. Wresting control of a victim’s inbox not only offers an adversary access to untold amounts of sensitive information but also the ability to impersonate legit user accounts and carry out a multitude of other malicious activities. Therefore, it’s no surprise that adversaries commonly target email systems and that defenders prioritize securing them.
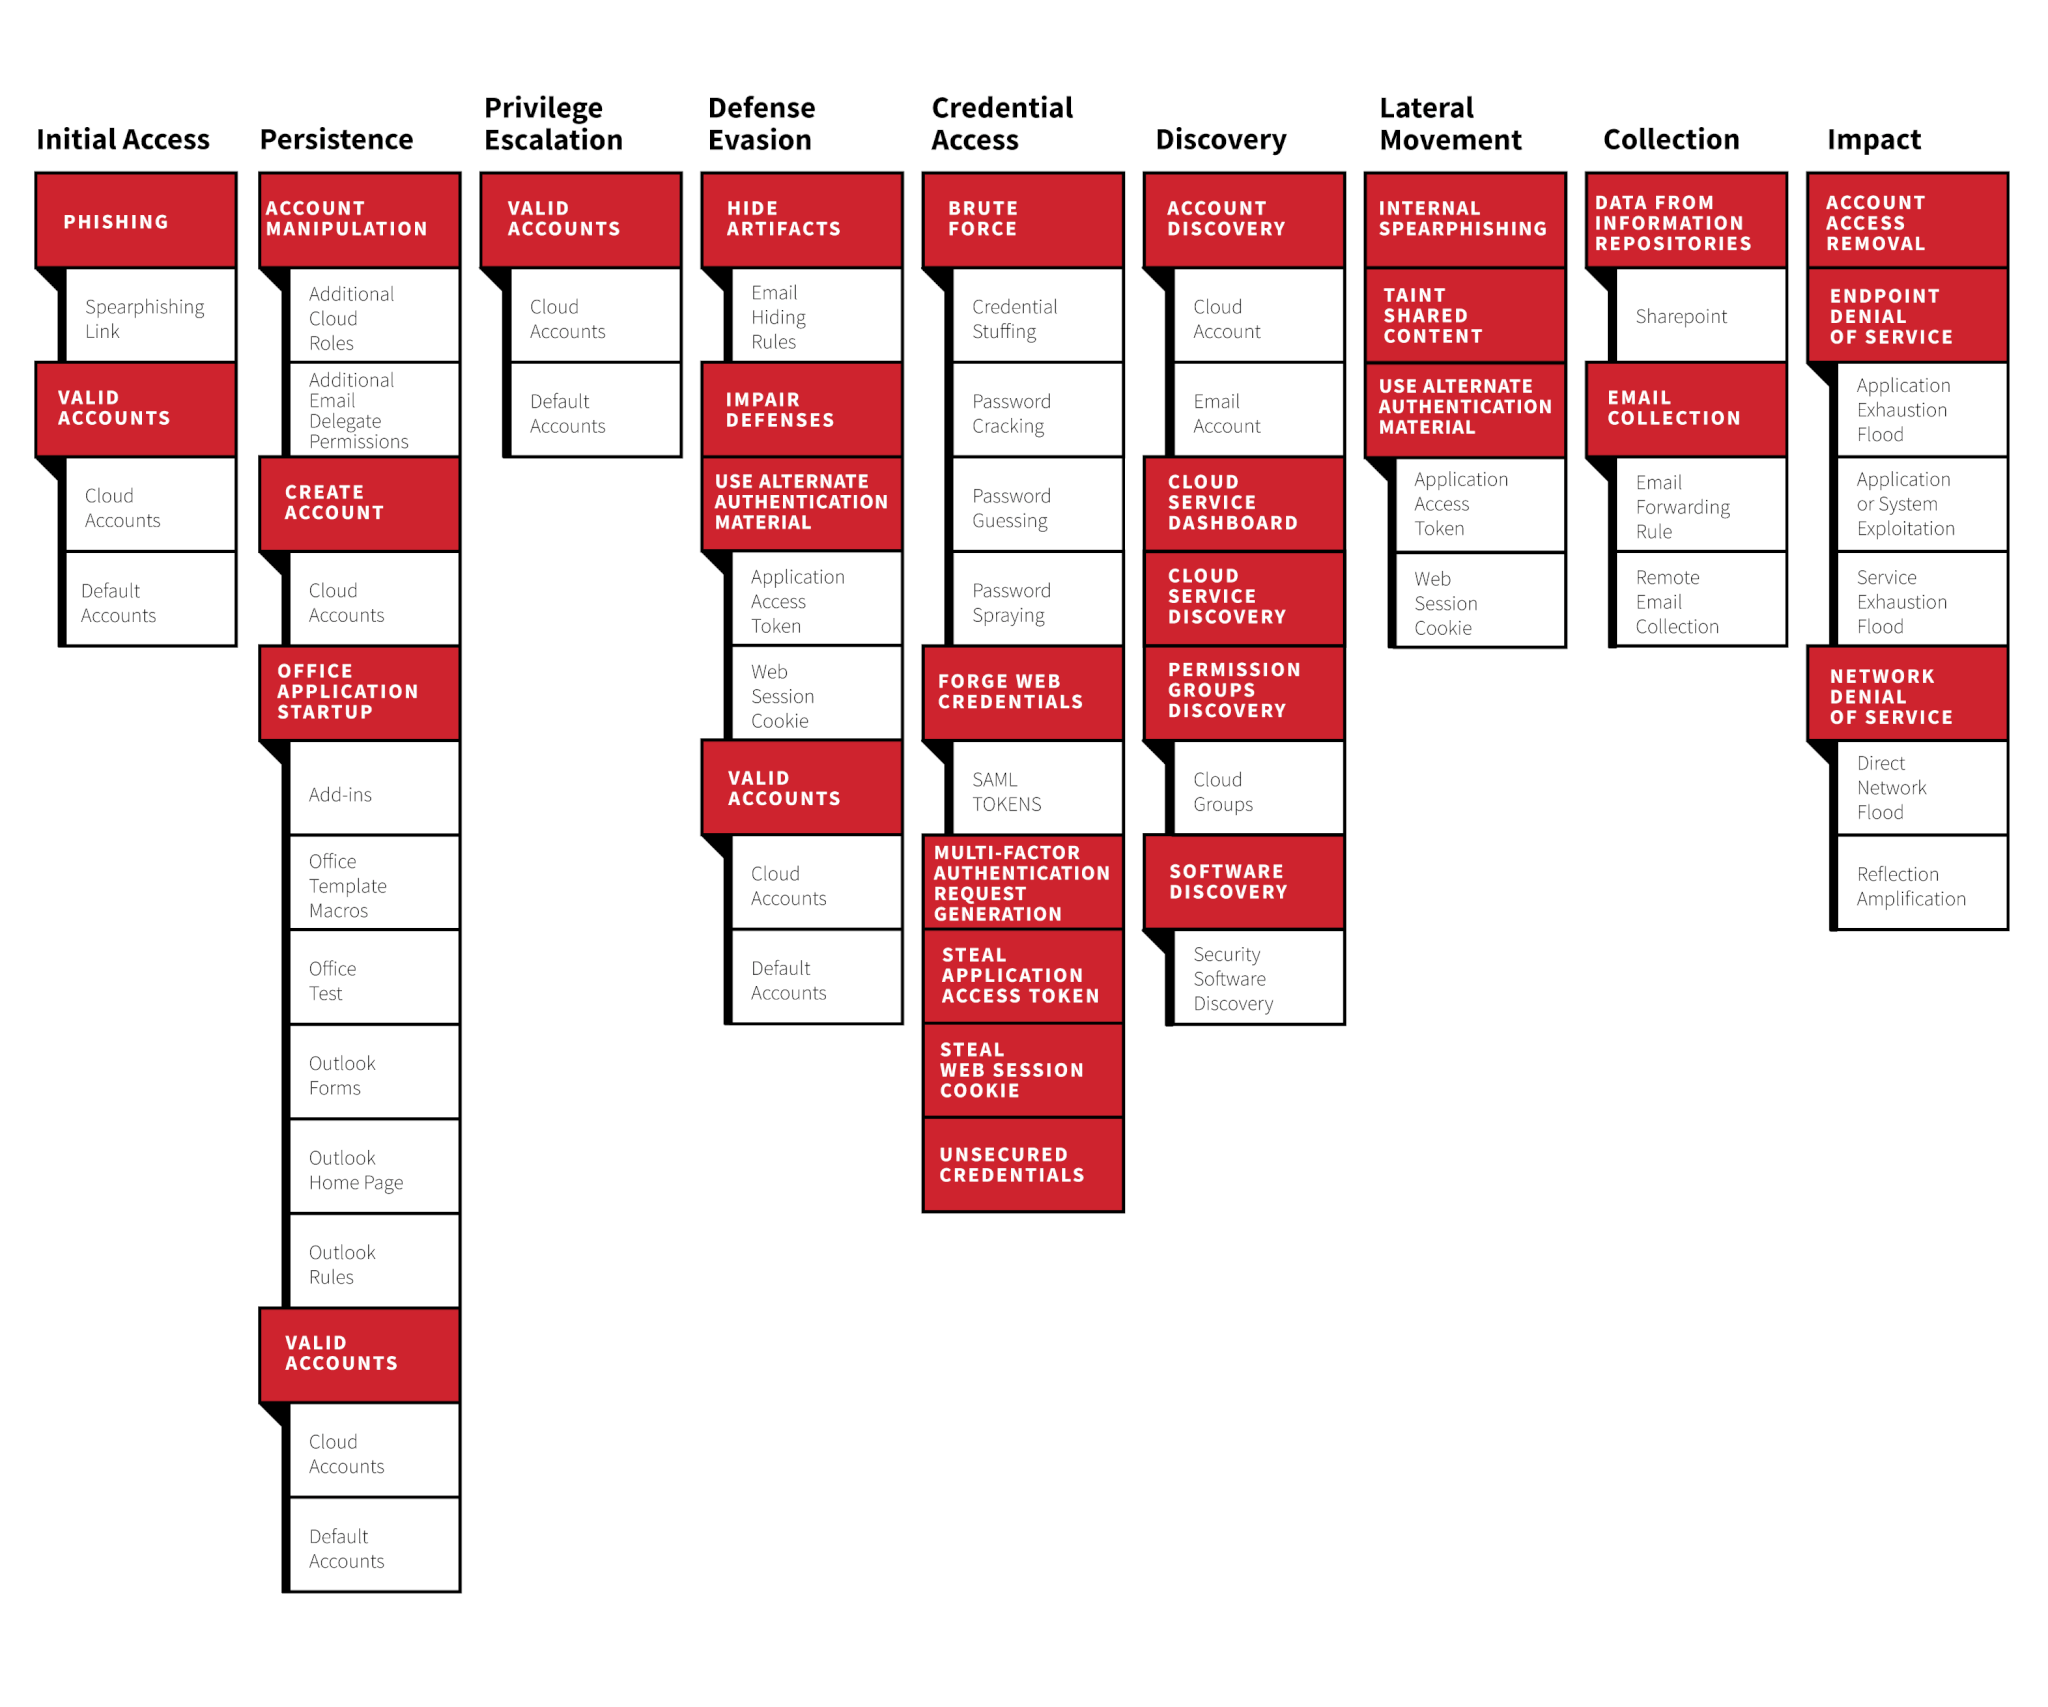
Whether it’s hosted locally or (as is more-than-likely) in the cloud, email accounts are practically endpoints that require hardening and layered defense mechanisms. As we can see in the MITRE ATT&CK Cloud Matrix for Office365, adversaries are capable of performing all the necessary tactics the security industry is familiar with. Although the techniques and procedures may be quite different, the concepts remain the same.
Saving [REDACTED]’s paycheck
We’ve got a group of Office 365 detection analytics that are designed to catch suspicious and malicious email activity. While it doesn’t necessarily include a email component, we’ve encountered attempted payroll diversion fraud over the years that follows some variation of the following pattern: the adversary compromises an email account and abuses their access in an attempt to update that user’s direct deposit information by corresponding via email with payroll department, forwarding relevant correspondence into a rarely used folder to evade notice, and eventually—if successful—routing the legitimate user’s paycheck into the criminal’s bank account.
In this post, we’re going to use real-world examples to dig into some of the post-compromise behaviors that typically correspond with this kind of attack. We’ll show you some of the relevant Microsoft 365 and Azure Active Directory artifacts contained in the Unified Audit Log (UAL), which is Microsoft’s data source for forensic investigations. Lastly, we’ll provide some tips on how you can detect, investigate, and respond to these sorts of compromises.
The initial lead
The initial investigative points often come from Office 365 detection analytics looking for email rules that copy or move email messages to rarely used folders—such as the “Archive” folder. Once an adversary triggers that detection analytic, our product presents our detection engineering team with a summarized event that, at a high-level, details the following:
User victim@example.com, logged in from IP X.X.X.X, created an email rule named “……….” that moves emails sent from person alice@example.com to the Archive folder
Some initial “tinfoil-hat” thoughts typically come to mind when reviewing an event like this:
- Does this user normally login from this IP?
- Can we use Geo-IP info for additional context?
- Does this user normally create inbox rules?
- What else occurred within this user’s login session?
- Any suspicious audit logs pre-date this event?
- What else did the user do after this rule was created?
- Any emails sent?
- Any sensitive emails accessed?
- Were any other email rules created?
- What does alice@example.com from the rule condition do within the organization?
The detection logic underlying that type of event assumes the user’s email account has been compromised based on how rare it is for that destination folder (the “archive” folder in this case) to be used in email rules, let alone the relative scarcity of email forwarding rules in the first place. It’s also common in these sorts of attacks for the adversary to log in from an atypical IP or location.
To slice and dice Microsoft’s UALs, we forward them into Splunk and use its visualization feature to plot users’ previous login activity, with the goal of spotting deviations over the last 14 days:

The above chart shows successful logins stemming from either Microsoft Exchange and Azure Active Directory for the victim of an attempted payroll diversion attack we detected. The spike in the chart isn’t terribly alarming on its own, but it’s noteworthy because it’s directly correlated with the time of one of our suspicious email rule events. Worth noting: in this particular case, additional context on these IPs didn’t show any scenarios indicating “impossible travel.”
Most of the successful logins occur from within the legitimate user’s expected geographic region—and none came from abroad.
To learn more about the spike, we generally create a timeline and start pivoting around the data for additional leads. Developing a timeline of behavior is important to help narrow down or expand the scope of our investigations. Figuring out what the user did in a given login session is typically a good starting point.
Quick (sort of) primer on UAL Pivoting
The chart above utilizes the following operations, which denote a login in the audit logs for each of the respective log origins:
| Workload | Operation |
|---|---|
| Workload: AzureActiveDirectory | Operation:
|
| Workload: Exchange | Operation:
|
What follows are a pair of examples illustrating the log data you would see from a UserLoggedIn and MailboxLogin operation.
Exchange MailboxLogin log sample
{"CreationTime":"2022-01-01T00:00:00","Id":"XXXXXXXX-XXXX-XXXX-XXXX-XXXXXXXXXXXX","Operation":"MailboxLogin","OrganizationId":"XXXXXXXX-XXXX-XXXX-XXXX-XXXXXXXXXXXX","RecordType":2,"ResultStatus":"Succeeded","UserKey":"XXXXXXXXXXXXXXXX","UserType":0,"Version":1,"Workload":"Exchange","ClientIP":"X.X.X.X","UserId":"victim@example.com","ClientIPAddress":"X.X.X.X","ClientInfoString":"Client=\/owa\/; Mozilla\/5.0 (Windows NT 10.0; Win64; x64) AppleWebKit\/537.36 (KHTML, like Gecko) Chrome\/100.0.0000.100 Safari\/500.00 Edg\/100.0.0000.00","ExternalAccess":false,"InternalLogonType":0,"LogonType":0,"LogonUserSid":"S-1-5-21-XXXXXXXXXX-XXXXXXXXX-XXXXXXXXXX-XXXXXXXX","MailboxGuid":"XXXXXXXX-XXXX-XXXX-XXXX-XXXXXXXXXXXX","MailboxOwnerSid":"S-1-5-21-XXXXXXXXXX-XXXXXXXXX-XXXXXXXXXX-XXXXXXXX","MailboxOwnerUPN":"victim@example.com","OrganizationName":"example.com","OriginatingServer":"XXXXXXXXXXXX","SessionId":"XXXXXXXX-XXXX-XXXX-XXXX-XXXXXXXXXXXX"}Azure Active Directory UserLoggedIn log sample
{"CreationTime":"2022-01-01T00:00:00","Id":"XXXXXXXX-XXXX-XXXX-XXXX-XXXXXXXXXXXX","Operation":"UserLoggedIn","OrganizationId":"XXXXXXXX-XXXX-XXXX-XXXX-XXXXXXXXXXXX","RecordType":15,"ResultStatus":"Success","UserKey":"XXXXXXXX-XXXX-XXXX-XXXX-XXXXXXXXXXXX","UserType":0,"Version":1,"Workload":"AzureActiveDirectory","ClientIP":"X.X.X.X","ObjectId":"XXXXXXXX-XXXX-XXXX-XXXX-XXXXXXXXXXXX","UserId":"victim@example.com","AzureActiveDirectoryEventType":1,"ExtendedProperties":[{"Name":"ResultStatusDetail","Value":"Redirect"},{"Name":"UserAgent","Value":"Mozilla\/5.0 (Windows NT 10.0; Win64; x64) AppleWebKit\/537.36 (KHTML, like Gecko) Chrome\/100.0.0000.100 Safari\/500.00 Edg\/100.0.0000.00"},{"Name":"RequestType","Value":"OAuth2:Authorize"}],"ModifiedProperties":[],"Actor":[{"ID":"XXXXXXXX-XXXX-XXXX-XXXX-XXXXXXXXXXXX","Type":0},{"ID":"victim@example.com","Type":5}],"ActorContextId":"XXXXXXXX-XXXX-XXXX-XXXX-XXXXXXXXXXXX","ActorIpAddress":"X.X.X.X","InterSystemsId":"XXXXXXXX-XXXX-XXXX-XXXX-XXXXXXXXXXXX","IntraSystemId":"XXXXXXXX-XXXX-XXXX-XXXX-XXXXXXXXXXXX","SupportTicketId":"","Target":[{"ID":"XXXXXXXX-XXXX-XXXX-XXXX-XXXXXXXXXXXX","Type":0}],"TargetContextId":"XXXXXXXX-XXXX-XXXX-XXXX-XXXXXXXXXXXX","ApplicationId":"XXXXXXXX-XXXX-XXXX-XXXX-XXXXXXXXXXXX","DeviceProperties":[{"Name":"OS","Value":"Windows 10"},{"Name":"BrowserType","Value":"Edge"},{"Name":"IsCompliantAndManaged","Value":"False"},{"Name":"SessionId","Value":" "}],"ErrorNumber":"0"}A pivot point is a piece of data that can expand or narrow down the scope of an investigation. Audit logs that stem from the Cloud may be totally new to defenders, particularly as cloud security research expands and as organizations invest more in cloud system visibility. Some of the fields we’re about to discuss may be new to those who are less familiar with cloud data, but they offer fantastic context that help us see the bigger picture when responding to incidents.
IP addresses in the audit logs overlap slightly between Exchange and Azure. Microsoft documentation explains how they are different and where you can find them, including the following table:
| Workload | Parameter | API notes |
|---|---|---|
| Workload: Exchange | Parameter: | API notes: The IP address of the device that was used when the operation was logged. The IP address is displayed in either an IPv4 or IPv6 address format. |
| Workload: AzureActiveDirectory + Exchange | Parameter: | API notes: The IP address of the device that was used when the activity was logged. The IP address is displayed in either an IPv4 or IPv6 address format. For some services, the value displayed in this property might be the IP address for a trusted application (for example, Office on the web apps) calling into the service on behalf of a user and not the IP address of the device used by person who performed the activity. Also, for Azure Active Directory-related events, the IP address isn’t logged and the value for the ClientIP property is |
| Workload: AzureActiveDirectory | Parameter: | API notes: The actor’s IP address in IPV4 or IPV6 address format. |
The IPs mainly help us understand if there might be other victim email accounts within the organization or other customer environments. Although easily changeable by the adversary, it’s a simple pivot point. Enriching the IP with context like geolocation, known vpn/proxy/tor services, ISP, and fraud activity helps detection engineers decide to pursue or ignore potential leads.
Another great field for targeting suspicious adversary behavior within a given logon period is the Session ID. These can be found in the SessionId field of the Exchange logs, but within AzureActiveDirectory they’re an embedded value found in the DeviceProperties JSON blob, as seen in the UserLoggedIn example above. Pivoting on Session ID is not a new concept and is also applied with endpoint telemetry to help develop timelines of adversary activity. In the example attack we’re about to return to, the adversary had one single logon session that we’ll use to follow their exact actions.
The ApplicationId, or AppID, helps identify what service the attackers targeted or logged into. This ID value is a unique representation of a Microsoft 365 resource in which defenders can use the CloudAppEvents table within Microsoft Defender for Cloud Apps to query for more detailed information on the application. While custom or third-party applications will have unique IDs, first-party Microsoft services have standard IDs that can be correlated to identify activity related to Microsoft services. The Application ID in our case was 00000002-0000-0ff1-ce00-000000000000, which Microsoft clearly defines as “Office 365 Exchange Online” in their catalog of commonly used Applications.
Lastly, the User Agent can help scope incidents, but is not necessarily considered a high-fidelity indicator since, these tend to have a large overlap with devices using the same browser and operating system versions. The User Agent is listed as the ClientInfoString in Exchange logs but in Azure Active Directory they’re found within the ExtendedProperties JSON, also seen in our log example listed above. In this particular investigation, the User Agent was pretty fruitful, as it was uniquely found within this one session.
Back to the attack
The following is a timeline of the adversary’s activity from our example detection, which we’ll detail further and use to explore relevant audit log telemetry.
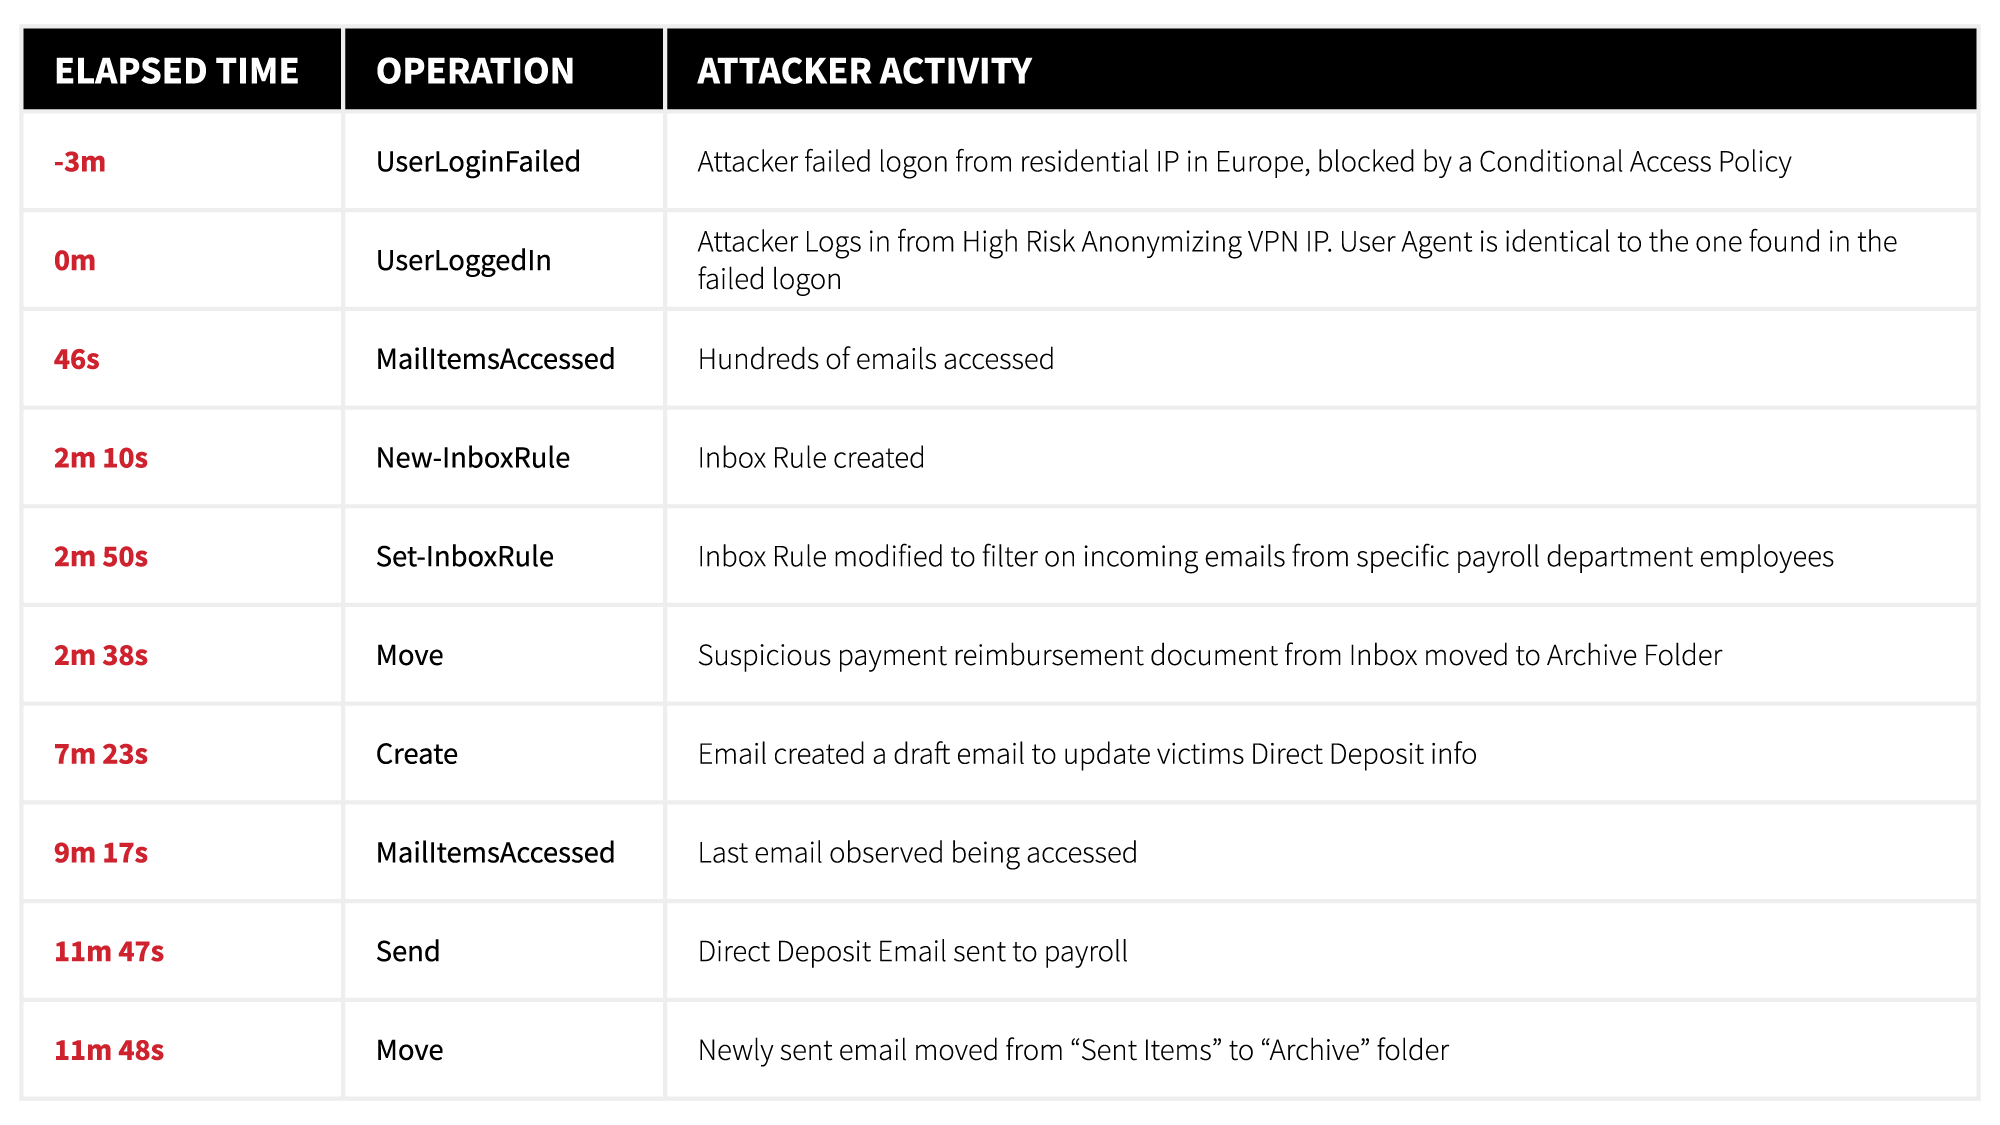
It’s usually a good idea to open the aperture on an investigation like this to figure out if there are any suspicious logs that preexist overtly malicious activity. You can do this by turning off operations or specific Session ID filters. Doing so in incidents like this often reveals failed logon attempts. The AppId field in the following example informs us that the failed logons occurred from the Office Home application. The following Exchange log shows relevant information about the failed logon:
{
  "CreationTime": "2022-01-01T00:00:00",
  "Id": "XXXXXXXX-XXXX-XXXX-XXXX-XXXXXXXXXXXX",
  "Operation": "UserLoginFailed",
  "OrganizationId": "XXXXXXXX-XXXX-XXXX-XXXX-XXXXXXXXXXXX",
  "RecordType": 15,
  "ResultStatus": "Success",
  "UserKey": "XXXXXXXX-XXXX-XXXX-XXXX-XXXXXXXXXXXX",
  "UserType": 0,
  "Version": 1,
  "Workload": "AzureActiveDirectory",
  "ClientIP": "X.X.X.X",
  "ObjectId": "XXXXXXXX-XXXX-XXXX-XXXX-XXXXXXXXXXXX",
  "UserId": “victim@example.com",
  "AzureActiveDirectoryEventType": 1,
  "ExtendedProperties": [
    {
      "Name": "ResultStatusDetail",
      "Value": "Success"
    },
    {
      "Name": "UserAgent",
      "Value": "Mozilla/5.0 (Windows NT 10.0; Win64; x64) AppleWebKit/537.36 (KHTML, like Gecko) Chrome/100.0.0000.100 Safari/500.00 Edg/100.0.0000.00"
    },
    {
      "Name": "UserAuthenticationMethod",
      "Value": "16"
    },
    {
      "Name": "RequestType",
      "Value": "Login:login"
    }
  ],
  "ModifiedProperties": [],
  "Actor": [
    {
      "ID": "XXXXXXXX-XXXX-XXXX-XXXX-XXXXXXXXXXXX",
      "Type": 0
    },
    {
      "ID": "victim@example.com",
      "Type": 5
    }],
  "ActorContextId": "XXXXXXXX-XXXX-XXXX-XXXX-XXXXXXXXXXXX",
  "ActorIpAddress": "X.X.X.X",
  "InterSystemsId": "XXXXXXXX-XXXX-XXXX-XXXX-XXXXXXXXXXXX",
  "IntraSystemId": "XXXXXXXX-XXXX-XXXX-XXXX-XXXXXXXXXXXX",
  "SupportTicketId": "",
  "Target": [
    {
      "ID": "XXXXXXXX-XXXX-XXXX-XXXX-XXXXXXXXXXXX",
      "Type": 0
    }],
  "TargetContextId": "XXXXXXXX-XXXX-XXXX-XXXX-XXXXXXXXXXXX",
  "ApplicationId": "4765445b-32c6-49b0-83e6-1d93765276ca",
  "DeviceProperties": [
    {
      "Name": "OS",
      "Value": "Windows 10"
    },
    {
      "Name": "BrowserType",
      "Value": "Edge"
    },
    {
      "Name": "IsCompliantAndManaged",
      "Value": "False"
    },
    {
      "Name": "SessionId",
      "Value": "victim@example.com"
    }],
  "ErrorNumber": "53003",
  "LogonError": "BlockedByConditionalAccess"
}Note: the LogonError field suggests that the logon attempt was blocked because of a custom configuration
We can now inspect the audit logs further for any operations that came in after the initial spike of logon activity. Using the SessionID acquired from the successful login we previously identified, we can then modifying our Splunk search to show all Exchange and Azure Active Directory operations associated with that SessionID that occurred with 15 minutes:
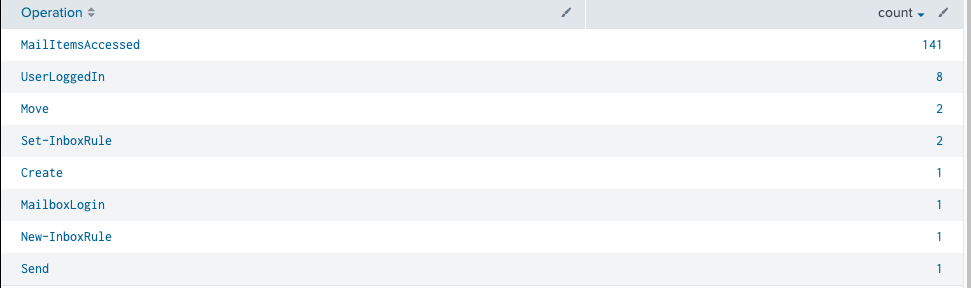
From this list we can see the New-InboxRule operation that initially tipped our Detection Engineering team off to unusual activity—as well as the Set-InboxRule operation that was used to modify the rule that was created. We can also see a large number of MailItemsAccessed, Create, Send, and Move operations. Let’s dive into each of these operations.
The Create operation is interesting. According to Microsoft, this event should not have been logged because creating, sending, or receiving a message isn’t audited. In our case, this does not appear to be true. This log shows that Outlook created a new entry in the “\Drafts” folder of the user mailbox within the same logon session that created the abnormal email rule. We can also see the subject of the email: “Direct Deposit Update”. More to come on that…
 {
  AppId: 00000002-0000-0ff1-ce00-000000000000
   ClientIP: X.X.X.X
   ClientIPAddress: X.X.X.X
   ClientInfoString: Mozilla/5.0 (Windows NT 10.0; Win64; x64) AppleWebKit/537.36 (KHTML, like Gecko) Chrome/100.0.0000.100 Safari/500.00 Edg/100.0.0000.00;
   CreationTime: 2022-01-01T00:00:00
   ExternalAccess: false
   InternalLogonType: 0
   Item: {
     Id: FolderID
     InternetMessageId: <MessageID>
     IsRecord: false
     ParentFolder: {
       Id: FolderID
       Path: \Drafts
     }
     SizeInBytes: 2555
     Subject: Direct Deposit Update
   }
   LogonType: 0
   MailboxOwnerUPN: victim@example.com
   Operation: Create
   OrganizationName: example.com

   RecordType: 2
   ResultStatus: Succeeded
   SessionId: XXXXXXXX-XXXX-XXXX-XXXX-XXXXXXXXXXXX
   UserId: victim@example.com
   Workload: Exchange
}
Send operations are generated when a user sends, replies to, or forwards an email message. In order to log this activity, the user must have an active Office 365 or Microsoft 365 E5 license applied to their account. Unfortunately this event does not provide who the message was sent to. To identify who the email was sent to, we use the InternetMessageId field to track the email in Exchange via the Get-MessageTrackingLog PowersShell module.
{
   AppId: 00000002-0000-0ff1-ce00-000000000000
   ClientIP: X.X.X.X
   ClientIPAddress: X.X.X.X
   ClientInfoString: Client=OWA;Action=ViaProxy
   CreationTime: 2022-01-01T00:00:00
   ExternalAccess: false
   InternalLogonType: 0
   Item: {
     Id: FolderID
     InternetMessageId: <MessageID>
     ParentFolder: {
       Id: FolderID
       Path: \Drafts
     }
     SizeInBytes: XXXX
     Subject: Direct Deposit Update
   }
   LogonType: 0
   MailboxOwnerUPN: victim@example.com
   Operation: Send
   OrganizationName: example.com

   RecordType: 2
   ResultStatus: Succeeded
   SessionId: XXXXXXXX-XXXX-XXXX-XXXX-XXXXXXXXXXXX
   UserId:victim@example.com
   Workload: Exchange
}
After the Send operation, we also noticed the actor moved the email they sent from the “Sent Items” folder to the “Archive” folder. Move operations simply log when a message is moved from one folder to another. Within this event, there are three nested fields that will help identify what was moved, where it was moved from, and where it was moved to. The fields of interest are AffectedItems, DestFolder and Folder. The AffectedItems field will provide information on the message that was moved. The DestFolder tells where the message went and the Folder field tells you where it was moved from.
{
   AffectedItems: [
     {
       InternetMessageId: <MessageID>
       ParentFolder: {
         Id: FolderID
         Path: \Sent Items
       }
       Subject: Direct Deposit Update
     }
   ]
   AppId: 00000002-0000-0ff1-ce00-000000000000
   ClientIP: X.X.X.X
   ClientIPAddress: X.X.X.X
   ClientInfoString: Client=OWA;Action=ViaProxy
   CreationTime: 2022-01-01T00:00:00
   CrossMailboxOperation: false
   DestFolder: {
     Id: FolderID
     Path: \Archive
   }
   ExternalAccess: false
   Folder: {
     Id: FolderID
     Path: \Sent Items
   }
   InternalLogonType: 0
   LogonType: 0
   MailboxOwnerUPN: victim@example.com
   Operation: Move
   OrganizationName: example.com

   RecordType: 3
   ResultStatus: Succeeded
   SessionId: XXXXXXXX-XXXX-XXXX-XXXX-XXXXXXXXXXXX
   UserId: victim@example.com
   Workload: Exchange
}
Now let’s talk about MailItemsAccessed. This operation tells us that within this logon session, a number of emails were actually accessed. To generate these logs, like the Send operation, the user must have an active Office 365 or Microsoft 365 E5 license. Within this operation, there is a key piece of information we need to identify: the access type that generated the log. There are two access methods that can be logged within MailItemsAccessed: sync and bind.
Sync logs indicate that an Outlook desktop client or other Exchange ActiveSync compatible client was used to synchronize messages between Exchange and the Client device. Sync logs only provide the mailbox folder that was synced. If you see an adversary sync a user’s inbox, you must assume that ALL emails in that user’s inbox are compromised. The same is true for any other folder within the user’s mailbox.
Bind logs work slightly differently than sync logs. They log individually accessed messages. Bind events will be generated for protocols such as POP, IMAP, EWS and REST. Within the log we can see the specific emails that were accessed based on their InternetMessageId. However, bind logs collect telemetry two minutes at a time, so a single bind log can show that multiple messages have been accessed. Another thing to note about bind logs is that they can be throttled. Throttling occurs when more than 1,000 MailItemsAccess logs are generated in less than 24 hours. Throttling is denoted in the log under the IsThrottled field.
There are a number of JSON blobs within one of these logs that contain the interesting information we need to identify what access type was used and the folders and messages accessed. The Folders blob will provide the mailbox folders that were accessed for both bind and sync logs, but bind logs will also have a FolderItems blob that contains the information for individual messages that were accessed. The OperationCount field provides the number of accessed items contained in the log (remember that MailItemsAccess rolls a 2-minute window of activity into a single log). Finally, the OperationProperties blob tells us the access type and indicates if the log is being throttled. In this particular case, we had 141 MailItemsAccessed logs resulting in the actor accessing over 1,500 emails in less than 20 minutes.
Note: we’re continuing to research why 141 logs were generated in this case, as Microsoft’s documentation seems to suggest that this activity ought to have been aggregated in a single audit record.
{ [-]
   AppId: 00000002-0000-0ff1-ce00-000000000000
   ClientIPAddress: X.X.X.X
   ClientInfoString: Client=OWA;Action=ViaProxy
   CreationTime: 2022-01-01T00:00:00
   ExternalAccess: false
   Folders: [
     {
       FolderItems: [
         {
           InternetMessageId: <MessageID>
         }
       ]
       Id: FolderID
       Path: \Drafts
     }
     {
       FolderItems: [
         {
           InternetMessageId: <MessageID>
         }
         {
           InternetMessageId: <MessageID>
         }
         {
           InternetMessageId: <MessageID>
         }
         {
           InternetMessageId: <MessageID>
         }
       ]
       Id: FolderID
       Path: \Sent Items
     }
   ]
   InternalLogonType: 0
   LogonType: 0
   MailboxOwnerUPN: victim@example.com
   Operation: MailItemsAccessed
   OperationCount: 5
   OperationProperties: [
     {
       Name: MailAccessType
       Value: Bind
     }
     {
       Name: IsThrottled
       Value: False
     }
   ]
   OrganizationName: victim@example.com

   RecordType: 50
   ResultStatus: Succeeded
   SessionId: XXXXXXXX-XXXX-XXXX-XXXX-XXXXXXXXXXXX
   UserId: victim@example.com
   Workload: Exchange
}
Not a minute to spare
This example attack spanned just 12 minutes, and while no one lost their paycheck in this case, it shows just how fast an adversary can go from compromised email account to potential theft.
In the end though, Microsoft’s various tools and log sources provide a valuable array of telemetry that security teams can use to observe, detect, and prevent suspicious email forwarding rules.
Related Articles
The million-dollar front door and the tailgater: Why strong auth could fail at SaaS session integrity
Lost in the cloud: What Home Alone 2 teaches us about cloud security
Lost in the cloud: What Home Alone 2 teaches us about cloud security
Patching for persistence: How DripDropper Linux malware moves through the cloud