
Pretending, adapting, and masquerading are all techniques you may be familiar with from the movies. These tactics and behaviors let characters accomplish their prerogatives without drawing too much attention to themselves. A prime example is Leonardo DiCaprio’s character in the 2002 film Catch Me If You Can, who disguises himself under different personas in order to cultivate his empire built on fraud and lies. Based on a true story, the film depicts con man Frank Abagnale, Jr.’s multiple scam operations and successful evasion from law enforcement. If it weren’t for a witty and creative FBI agent, played by Tom Hanks, the criminal would not have been caught for many years.

Red Canary has observed similar “Leonardos” over the years, as adversaries often drop payloads with seemingly benign characteristics. These payloads are typically designed to easily bypass normal controls like static antivirus signatures, but they also take advantage of human confirmation biases. Without proper context, analysts may quickly write off these witty payloads as legitimate system activity, letting threat actors potentially run wild.
The art of automated hunting
Because of this, detection engineers have to get a little creative when looking out for malicious behavior on system endpoints. The first step to flagging abnormal behavior is to pinpoint exactly what “normal” looks like. Windows machines spawn many processes simultaneously upon booting up, and this SANS poster presents some great initial information in determining what a normal execution flow looks like on a freshly installed Windows machine.
If we know what expected, legitimate activity looks like, based on our own collected telemetry or open source data, we can start our journey of determining the characteristics of abnormal activity and form numerous hypotheses that can lead to high-signal analytics. Additionally, we should decide whether we’re approaching our detection capabilities based on known malicious behaviors from existing detections or detecting based on a deviation from expected, legitimate behaviors.

Let’s look at some examples of known malware detections that may inspire your own creative detection capabilities.
Detecting Masquerading
Masquerading (T1036) was the sixth most prevalent threat listed in Red Canary’s 2020 Threat Detection Report. MITRE ATT&CK defines the technique as:
Masquerading occurs when the name or location of an object, legitimate or malicious, is manipulated or abused for the sake of evading defenses and observation. This may include manipulating file metadata, tricking users into misidentifying the file type, and giving legitimate task or service names.
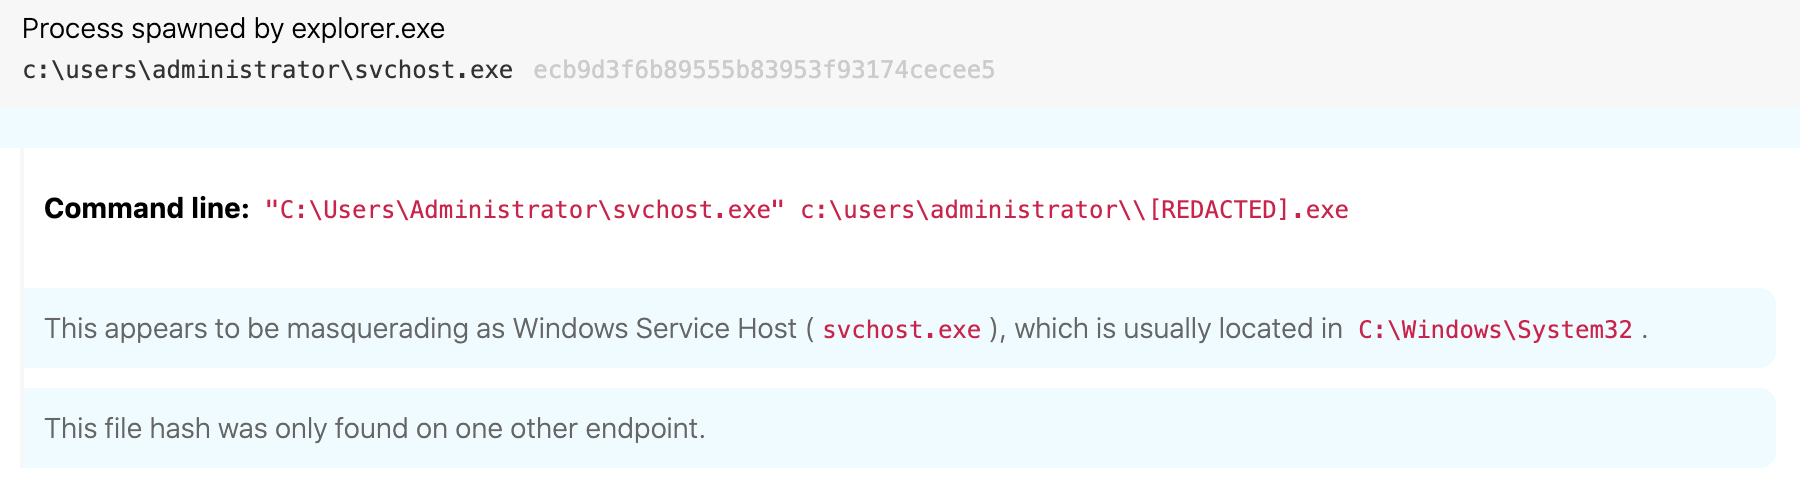
To begin the process of detecting Masquerading, keep in mind that Windows processes have expected characteristics like known file paths, user accounts, and parent processes. With masquerading, we expect malware authors to name their payloads the same as Windows processes. In order to drive detection, we’ll need to create some logic that flags whenever any of these processes don’t execute as expected, so an analyst can look beyond deceptive filenames.
A regularly abused process Red Canary observes quite often is the Windows Service Host (svchost.exe). We expect svchost.exe to have the following properties when executed:
- File path:
C:\Windows\System32\svchost.exe OR C:\Windows\SysWOW64\svchost.exe - Process name:
svchost.exe - Command line: includes:
-k - Internal name:
svchost.exe
Some corresponding pseudo-detection logic to find abnormalities could look like:
Process_name:’svchost.exe’ AND
(process_path_does_not_include:’Windows\System32\’
OR process_path_does_not_include:’Windows\SysWOW64\’ )
Detection logic like the one above could catch evil activity like Locky ransomware and other families that take advantage of masquerading the svchost process:
Spotting makeshift disguises
As mentioned earlier, adversaries like to take advantage of the fact that analysts may not always have the proper tools, data, or context to investigate threats thoroughly. For example, a common practice in forensics is to gather a list of running processes for an analyst to review. Given a process listing (or many lists depending on the scope of the investigation), it may not be obvious that a malicious instance of svchost is running if you don’t also retrieve data like process paths.
If I’m an adversary, I’d be wary of naming my payload the same as the svchost process because detecting it is generally a simple process given the detection logic above. Another common technique is to slightly modify a legit process and execute a payload that way.
Some examples could include:
svchos.exeschost.exescvhost.exesvhost.exe
This makes our detection logic above too specific. It only takes a slight character change in the process name to bypass our rule. Drawing from our previous blog post about detected false positives using string comparison algorithms, let’s flip the table and use our knowledge to identify true positives.

In the previous blog post, we used a certain string comparison algorithm called the Jaccard Similarity Index to obtain a percentage of similarity between two strings. Our logic needs some adjustment because we want to see slight deviations in process names. Not only can we still use the logic, we can go one step further.
Rather than asking your data show me two process names that are N% similar, but not identical, instead we should ask show me process names that are X deviations from the original process name. If we had asked for a percentage value to be returned, the length of the suspect string would skew our results. If we searched for deviations in longer process names, it would be difficult to find a corresponding percentage value but with a count of deviations, the length of the process names would not be a problem.
In order to do this, we’ll need to utilize the Damerau-Levenshtein distance, which outputs the number of character substitutions, transpositions, deletions, and insertions it takes for one string to become another.
Since this is an open source function, we can utilize the following Ruby implementation:
def calculate_damerau_levenshtein_distance(word1:, word2:)
    word1 = word1.downcase
    word2 = word2.downcase
    # Accounts for insertion, deletion, substitution, and transposition
    word1, word2 = word2, word1 if word1.length > word2.length

    # array of codepoints outperforms String
    word1 = word1.codepoints if word1.is_a? String
    word2 = word2.codepoints if word2.is_a? String

    rows = word1.length
    cols = word2.length
    return cols if rows.zero?
    return rows if cols.zero?

    # 'infinite' edit distance for padding cost matrix.
    # Can be any value > max[rows, cols]
    inf = rows + cols

    matrix = [Array.new(cols + 2, inf)]
    matrix << 0.upto(cols).to_a.unshift(inf)

    # element => last row seen
    item_history = Hash.new(0)

    1.upto(rows) do |row|
      # generate next row of cost matrix
      new_row = Array.new(cols + 2, 0)
      new_row[0] = inf
      new_row[1] = row
      matrix << new_row

      last_match_col = 0
      seq1_item = word1[row - 1]

      1.upto(cols) do |col|
        seq2_item = word2[col - 1]
        last_match_row = item_history[seq2_item]

        sub_cost = seq1_item == seq2_item ? 0 : 1

        transposition = 1 + matrix[last_match_row][last_match_col]
        transposition += row - last_match_row - 1
        transposition += col - last_match_col - 1

        cost = [
          matrix[row][col] + sub_cost,
          matrix[row][col + 1] + 1,
          matrix[row + 1][col] + 1,
          transposition
        ].min

        matrix[row + 1][col + 1] = cost

        last_match_col = col if sub_cost.zero?
      end

      item_history[seq1_item] = row
    end

   matrix[rows + 1][cols + 1]
  end
If we run this function with the following arguments:
Calculate_damerau_levenshtein_distance word1: ‘svchost.exe’,
                                       word2: ‘scvhost.exe’
We receive an output of 1 since it only takes a single adjacent transposition of cv to vc to become the original string.
If we also execute the following:
Calculate_damerau_levenshtein_distance word1: ‘svchost.exe’,
                                       word2: ‘svhost.exe’
We also get an output of 1 because it only takes an insertion of the letter c to transform svhost.exe into svchost.exe. The same idea applies to substitution and deletion operations, where we remove or delete characters and replace them to match two strings. This function helps track even the the slightest adjustments to process names meant to evade human eyes.
Malware families like MedusaLocker ransomware will name and place their payloads in %AppData%\Roaming\svchostt.exe. Cryptominers and some exploitation frameworks may also take advantage of this technique.
Let’s also not forget that svchost is not the only process targeted by adversaries. Other processes like winlogon.exe and services.exe also apply.
Cobalt Strike:

Meterpreter:

Detecting process path masquerading
We’ve talked about adversaries naming their payloads after native processes and renaming them with slight deviations. Malware can also take advantage of naive detection logic. Analysts take many different approaches with their logic. For example, adversaries may be able to bypass a query stating something along the lines of show me anytime a process is executing outside of system32, depending on how you structured it. Naive logic may look something like:
Process_Name: svchost.exe AND
Process_Path_Does_Not_Include: “\system32\”
If svchost.exe is relocated to the following path observed in a real-world attack, our logic has been evaded: C:\WINDOWS\system32\gVQryRT\svchost.exe
Dridex is a thoroughly documented malware family that’s been evolving for years. One of the techniques Dridex is known to take advantage of is relocating native Windows binaries and performing a search order hijacking attack. The payloads are usually dropped in the same directory as the newly relocated process and executed in memory in the form of a DLL. Dridex typically relocates and creates new subdirectories under common file paths, including but not limited to:
%localappdata%\AppData\Local\*\%APPDATA%\AppData\Roaming\*\%windir%\System32\Windows\System32\*\%TEMP%\AppData\Local\Temp\*\
It’s pretty simple to create an analytic that searches for relocated instances of native processes. All you have to do is collect a list of all signed Windows binaries that exist on a host and then seek out instances where they exist outside of their normal directory. This approach searches for unexpected executions and usually isn’t noisy for most environments. However, it can be noisy—and may generate high volumes of false positives—if you’re running enterprise software that drops its own copies of Windows binaries. If this is the case, it’s always best to continually tune your detection logic.
Dridex also has the ability to take advantage of nimble detection logic, as previously mentioned, and tired-eyed analysts by obscuring process paths. Not only does Dridex relocate binaries to highly suspicious paths that may seemingly be easy for analysts to escalate immediately, it also manipulates system paths in a way that may look legitimate at a quick glance.

Let’s play a game
What’s wrong with the following process paths?
C:\windows \system32\systempropertieshardware.exe
C:\windows\ system32\tcmsetup.exe
They may look legitimate, but if you look closer you would notice an extra space after “windows” or before “system32.” We now know how to find slight deviations in process names with the Damerau-Levenshtein distance algorithm. We can also apply that logic to finding abnormal system paths. This logic is a threat-centric approach to developing low-signal, high-fidelity alerts. Under normal circumstances, slight modifications to systems paths are highly abnormal and should be investigated thoroughly.
Since Dridex chooses various different binaries vulnerable to search order hijacking, we’ll need to parse out the process name. After parsing out the process name (since Dridex targets many different ones upon execution), we can now feed our function the two process paths for comparison and alerting. The following execution of our Damerau Levenshtein function returns a 1 after identifying the insertion of a whitespace:
Calculate_damerau_levenshtein_distance
word1: ‘c:\windows \system32\’,
word2: ‘c:\windows\system32\’
Final scene
As cyber investigators, we can draw our own parallels to Catch Me If You Can. Catching Leonardo’s doppelgangers was not an easy task. It required years of investigating data to finally clinch his arrest. The FBI eventually recruited Leonardo’s character to become a special agent, destined to catch newer versions of himself. In the end, the bad guys get caught and the good guys leave their investigations with many lessons learned.
As always, every environment will produce different results if you follow the detection guidance. You should make sure your detection logic is refined in order to suit your needs. Detection engineering involves developing new innovative detection capabilities as much as it requires continuously driving down alert volume through effective tuning. The quicker you can cut through the noise, the faster you can identify and eradicate threats, no matter what disguise they put on that day.

Related Articles
Train, triage, repeat: The AI agent changing how we fight phishing
The dual-use dilemma: Rethinking detection for remote access tool abuse
The dual-use dilemma: Rethinking detection for remote access tool abuse
Investigating suspicious AI workflows in Microsoft Entra Agent ID: Assistive agents